martedì 25 febbraio 2020

ICS#20.08 Spring is cooming by Francesca

Hi Everyone,
today I propose an easy project that you can try to complete also who have little time or those who want to enter the world of Scrapbooking and do not know where to start or those who have children who have a great desire to mess around ... just everyone!


The materials require a low budget and you can find them all in the Marte Store OnLine www.martesavona.com


For this project I started from the basic of scrapbooking and more precisely from the etymology of the name: SCRAP means CUT and from here I want to bring to mind every time in our childhood we took a newspaper clipping, torn pages of magazines, cut out old peices of threadbase cloth to play and stick them together ... today I really wanted to be a child again.

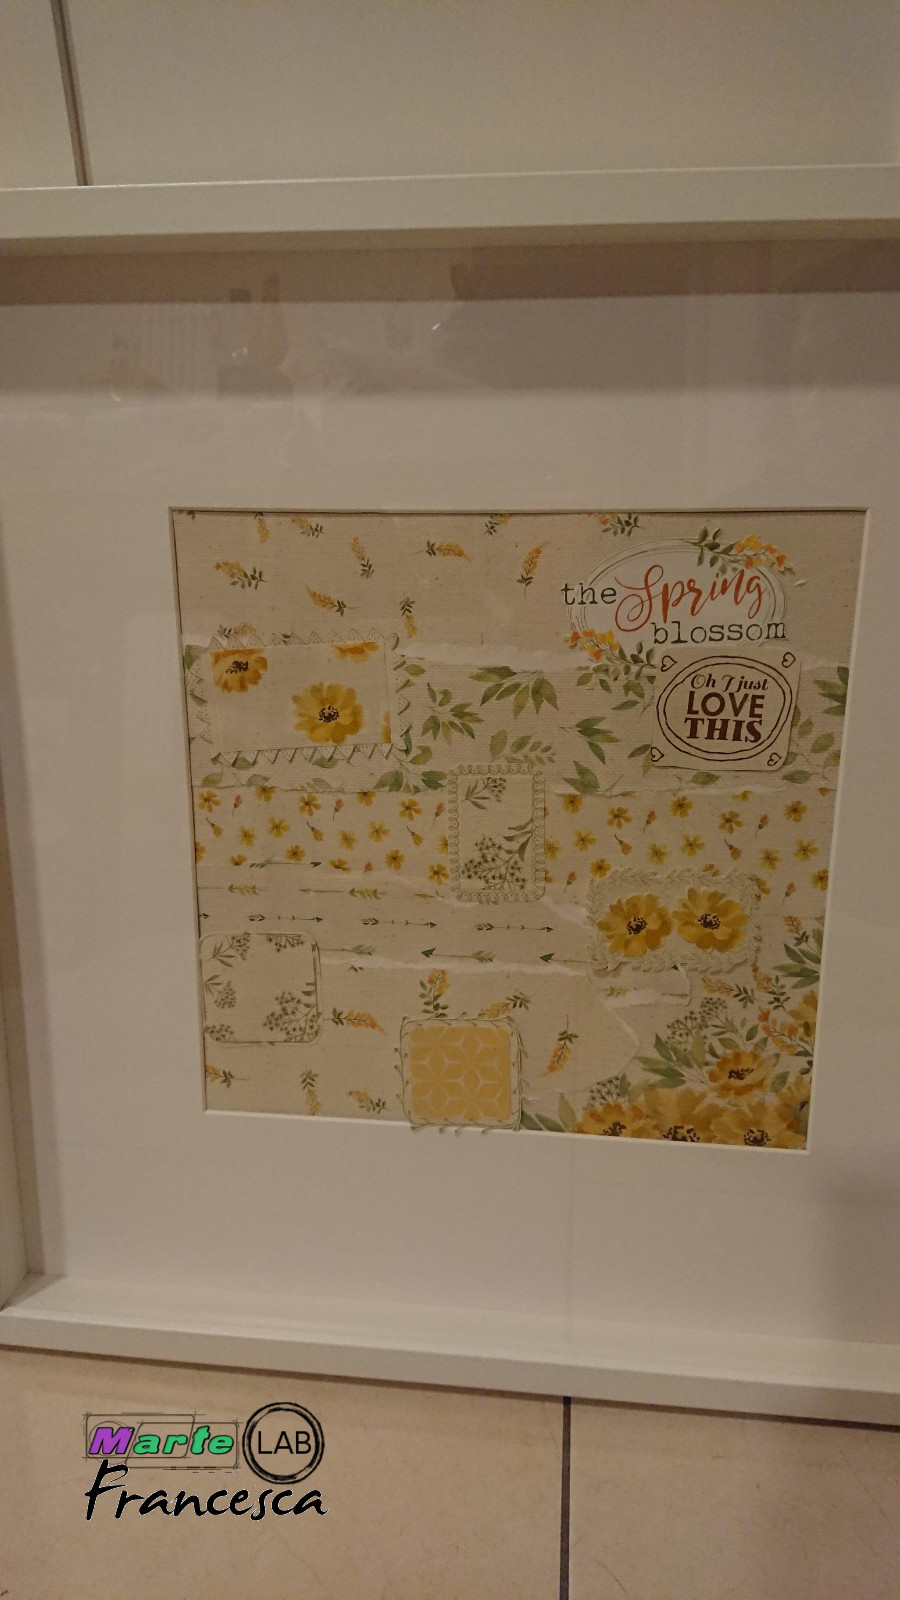
I took this beautifull pad of very spring in shades of yellow (not to forget that in addiction to having spring at the door, in a few weeks it will be March 8 and everything around us will be tinged with yellow). I used everything, even the cover page to add very nice details that cutting them out can serve as embellishments.

I really started by cutting the title of the collection from the covere and I got the theme of my home decor, then I chose among the papers those that most recalled spring; the background paper is perfect for this type of work (or for a LO) as it has decorations only on the edges, the cards that I went instead to tear obtaining strips are those that most recall the floral theme and I glued the strips tear horizontally on the paper chosen as the background.


Later I took the paper on which many very nice frames were printed which can serve the most varied uses and here I illustrate some of them.
IO cut out the frames that I liked most and on one I applied the stamp of the Prima Marketing thus creating an embellishment that I applied close to the them of the home decor (it served to cover the word "collection" from the title of the pad).


To the other frames I simply applied paper cutouts, almost as if the flowers were anclosed inside them and I then applied everything to my liking.


I then applied my home decor inside a frame ... and here it is!


Se you soon

    Francesca


martedì 18 febbraio 2020

ICS#20.07 Double Spread Art Journal by Nora

ICS#20.07 Double Spread Art Journal by Nora

I have a new project to share with you, I have used lots of stencils and stamps...


I prepared a video tutorial for you...


I hope you have enjoyed it!
Have a wonderful time!
Bye


martedì 11 febbraio 2020

PaperArtsy Dragonfly Tag by Jenny

Hi everyone and welcome. I'm so excited to have been invited to join you all here at MarteLAB alongside so many amazing designers. Today I've got a mixed media tag to share with you that features the wonderful designs of Kay Carley. Here's the tag;


And here's how it came together using the PaperArtsy stamp set EKC06 and stencil PS059;

After stamping the large flower stem on a piece of tea stained copier paper with permanent black ink I added the words from the set around the border. A little water was mixed to Insfusions 'In The Navy' and 'Violetta' so I could paint the flowers, first with the Violetta, then with the In the Navy over the top.


After repeating this process on extra layers of paper I cut around them and layered them onto the original to give the flowers more delicacy and depth. The stem was painted with Infusions 'Slime' mixed with water. To finish dots of white gel pen were added to the centre of each individual flower.


I covered a large thick board tag in layers of blue, purple and cream paint and then stamped more of the flowers and stems from the stamp set onto it with permanent black ink. Over the top I stencilled more flower heads with texture paste, painting it after with lime green paint to match the stem in the large panel.


To finish I added the stamped flower panel to the tag with lace trim underneath. The dragonflies were stamped onto painted paper stuck onto acetate so it could be moulded with some heat. To give the dragonflies a shimmery look try using PaperArtsy Metallic Finish Glaze. Finally I tied a large bow onto the top of the tag and glued some iridescent gems next to the stem.

Here are some close ups of the finished tag;


I hope you've enjoyed seeing today's project and can see the beauty in Kay Carley's stamp set. The stamps, stencil and Infusions are all available in the Marte store along with lots more PaperArtsy sets so make sure to check them out.

Thanks for visiting
Jenny (Pushing The Right Buttons)

martedì 4 febbraio 2020

ICS#20.05 Love journal by Marcella

Hi everyone,
here I am again on the blog with a new project ... looking towards Valentine!


I recovered some petals from a poinsettia using them to decorate papers previously colored with hibiscus.


I used watercolor paper gr320 folded with a spine to make the cover.
I stamped a watercolor paper with "Love" from Set#12 of AALL&CREATE stam set with StazOn Black Cherry.
Then I cut a 2mm cardboard label with Tim Holtz die 656938, filed and colored with dry brush technique.

With embossing tecnique, I filled the inside of the label with 3 layers of clear powder to create a vitrified effect.
The edges of the label have also been embossed with Seth Apter powder Patina Oxide to create an antiqued rusty effect.


I colored the cover with Distress Oxide in colors coordinated with the sheets and subsequently aged the edges and the cover with Walnut Stain Distress Oxide.


 I used rubber stamps with the botanical theme to stamp the cover always using Distress Oxide.
I sewed two signatures inside the journal with waxed thread and pasted the label with Beacon Fabri-Tac.
And the journal "Love" is finished!
Thanks so much for stopping by! I hope you found something that sparked your interest.

All the products used can be found on Marte StoreOnLine at

www.martesavona.com

You can enjoy a 15% discount by using the coupon ICS20XX at the checkout. The coupon is valid for the products used in all projects published on the blog!

    Marcella