Visualizzazione post con etichetta Aallandcreate stamps. Mostra tutti i post

martedì 20 ottobre 2020

Take the Scenic Route Plaque - by Claudia

Hi, servus and thanks so much for stopping by!

Today I would like to share with you a plaque with the focal element being an Aall & Create stamp design.


As a substrate I used a left over piece of heavy greyboard that I cut to size using a pair of heavy duty scissors. I measured the size for my plaque according to my focal element - the train scene from the Aall & Create border stamp #76.


I have used some more Aall & Create stamps and one stencil, but let's start with the first step of the tuto!

I primed my greyboard plaque with a thorough layer of black acrylic paint and after that had dried, I loosely scraped some white Gesso on top with a wide palette knife. I made sure some black spots still showed through. (for larger view simply click on the images)


The train scene had been stamped with black archival stamping ink onto some tissue and fussy cut. I used it to mark particular spots of the motive on my plaque, so I knew where to add additional designs without covering up the image.


Then I rummaged my paper bits box and fetched some old book pages, designer paper scraps, dried coffee pads and tea bags, a left over print done with the Aall & Create stencil #28 (at the very right) and some die cut left overs...


Time to collage away! The black and white Aall & Create "stencil print" got cut into strips that I used here and there for additional texture.


Then I toned down the whole background by adding a thin layer of diluted Titanium White DecoArt media fluid acrylic paint. Once that had dried, I did some scribbling with a pencil.


Finally it was time for the tissue stamped image to get glued in place! I used a very thin Decoupage glue so the tissue would not tear while being glued in place (using a very soft wide brush). You can of course also dilute the one you have to make it more liquid-y).
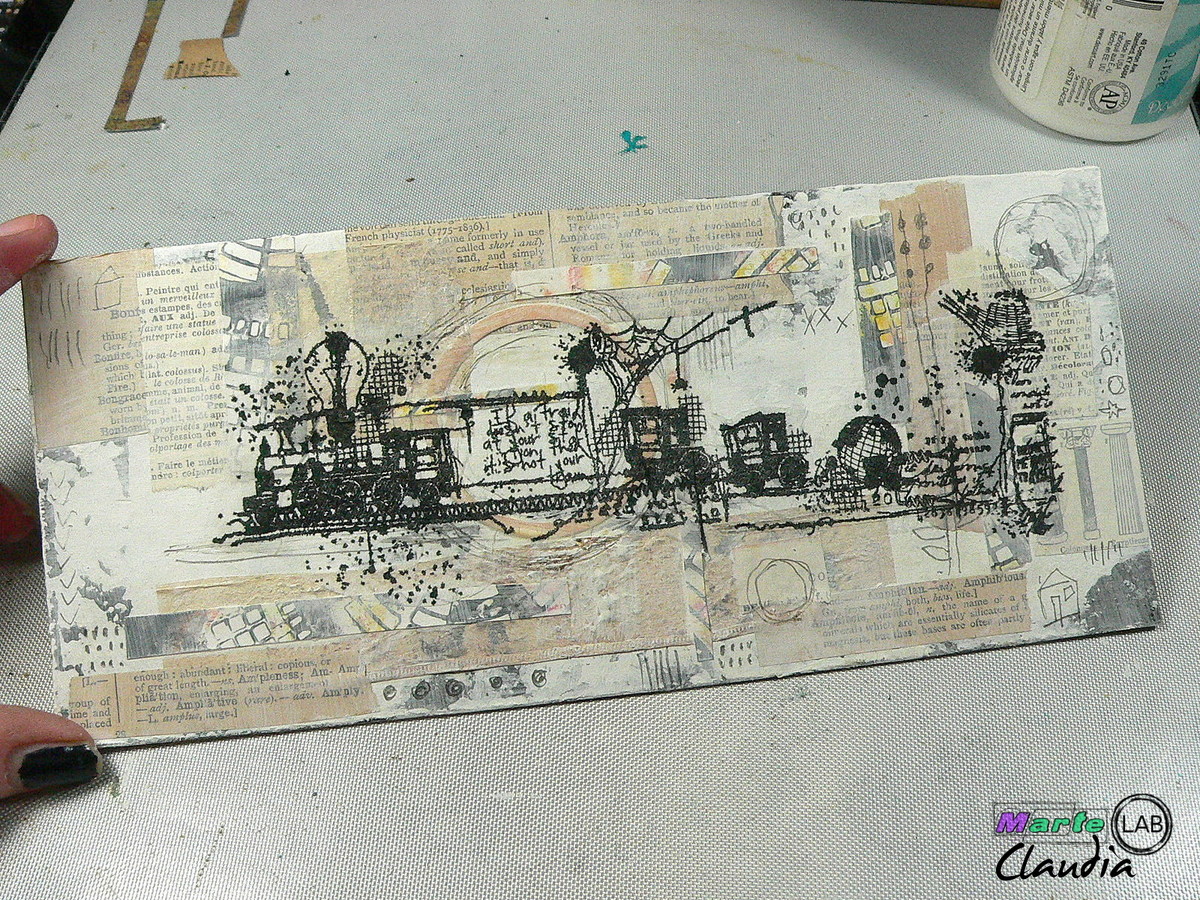


The Aall & Create stamp set #10 (one of my favourites) was perfect for adding more patterns and depth!


I let the black archival stamping ink dry before I went in with DecoArt media fluid acrylic paint "Transparent Yellow Iron Oxide" as a first.


That got followed by DecoArt media fluid acrylics Hansa Yellow Medium, Quinacridone Burnt Orange, Burnt Umber and more Titanium White.


I also added some doodling with a white acrylic paint pen here and there.
The "Take the Scenic Route" Quote Chip finished off the design.


Finally I blended the plaque's edges with black archival stamping ink using a piece of blending foam and I decided to add some hints of gold using gold wax (which I simply applied with my fingertip).


A thin gold and white outline around the plaque's edges helped fuse all the visual elements in the design.


Fatto! 


Some close ups:


...and once more the finished plaque. 


All you need to create a mixed media plaque like this can be found in the Marte online store of course (if not the exact brand then there is a product from a different manufacturer). 

Hugs and happy crafting!
Claudia
xxx


martedì 11 agosto 2020

Free to Fly! Summer Time Tag by Claudia

Hi, servus and ciao á tutti!

Summer is in full swing and hot as always and I am finally enjoying our summer holidays at the lake! Each day I ride my kayak and pass by a lot of bays with small wooden docks with ducks taking a nap on these. Sometimes I find some of their beautiful feathers and collect them for later use - as for this summer-y tag:


(click on images for larger view)


I have used Aall & Create stamps #58 and 60 and stencil #9 again to create my tag. 

Here's how I did it:


I started by stamping part of the large A4 #58 stamp onto pieces of Deli paper (you can also use tissue paper of course) for later use. As the stamp is a bit sticky make sure to use a well inked ink pad with black archival stamping ink


I made four sheets of stamped on Deli paper. Some of these go to my stash for later projects. For best results with the huge stamps I lay these flat on my desk, ink part of the stamp, then put the paper on top and rub across that with my hand. So I am rather pulling prints instead of stamping the paper.


Next I stamped the lovely Mandala image from stamp #60 onto a piece of Deli paper as well and some of the stars from this stamp set onto white cardstock


Time to prepare my tag!

I have used an MDF tag but you can also (die) cut a tag from heavy cardboard and use that instead. It will work just as well. I added several layers of heavy body white Gesso to the tag with a palette knife. While scraping on the Gesso I made sure I created overlaps and a lot of texture.

Next I took a sculpting tool (you can also use the other end of a brush) and scribbled into the still wet Gesso. I left the tag to dry naturally.


Once the Gesso had dried, I sprayed on some rusty hinge and broken china Distress Spray Stains and diluted these with water to create drip lines. Then I used my heat tool to dry the tag.


I played around with various designs and then cut out the pieces from the stamped Deli paper I wanted to use on my tag. As you can see I have put the focal element in place already, but haven't glued it in place yet as it first needed some priming on the back!


To have the detail from the lovely Mandala design stand out from the background I simply painted the back of the fussy cut stamped image with a layer of Titanium White DecoArt media fluid acrylic paint using a soft brush. I didn't paint the other Deli paper pieces though as I wanted these to stay transparent.


Time to glue the Deli paper pieces in place. I used a  soft brush and thin decoupage glue and sealant to not tear the Deli paper while gluing it to the tag. You can find some (from a different brand than shown in my picture) in the Marte Savona online store of course - as all the other media and products I have used to create this tag.


Using a detail brush I painted part of the Mandala design with Titanium White.


Next I added some Modelling Paste through Aall & Create stencil #9. As I only wanted to use the thin strip design in the middle of the stencil, I masked the other designs on the stencil with some painters tape.


I let the Modelling Paste dry naturally before I sprayed on additional rusty hinge Distress Spray Stain and water to highlight the texture of the stencilled pattern.


I also used the rusty hinge Spray Stain to colour my fussy cut stars.


Next I hand cut part of a circle shape from heavy cardstock, painted that in Titanium White too and glued some stamped Deli paper on top. After I had inked the edges of my circle segment with black archival stamping ink I glued my feather to it and wrapped some soft black wire around it.


Time to glue everything in place and put together my design!
The focal piece with the glued on feather got fixed to the tag using black sticky foam pads. I cut one of these into smaller pieces to fix the stars to the tag too.


I blended the tag's edges with black stamping ink using a foam pad.


Then I finished off my tag by adding a word sticker and wrapping more black wire around it.


To secure the wire on the back of a tag I simply twist the ends together and bend them flat. Then I cover the wire on the back with large piece of Gaffer tape. If you want your tag to look good on the back too you can also use some heavy designer paper to cover everything up.

Voilá - the finished tag! 


some close ups: 


and once more the whole tag: 


I hope you like my tag and maybe get to collect some nature finds too to use them on your version of my tag ;)

Happy holidays!

Claudia
xxx


martedì 16 giugno 2020

"Embrace Art" Artist Trading Block - by Claudia

Hi, servus and ciao à tutti!

Claudia here again! Today I want to share with you an Artist Trading Block I've made using Aall & Create stamps and stencils and Distress and Distress Oxide Inks mainly.


I have used Aall & Create stencils #9 and #10 and stamp sets #26 and #10 alongside Distress Inks "black soot" and "rusty hinge" and Distress Oxide Inks "mowed lawn", "ripe persimmon", "fossilised amber" and "stormy sky". Distress Spray Stain "fired brick" was used to create the hearts I've added to the black soft wire and black archival stamping ink was used to stamp the Aall & Create images.

But let me take you through the process step by step (as always click on the images for a larger view):


I used the Artist Trading Block as a template to draw the squares on some heavy printer paper and then cut five squares of the same size.


Next I placed my squares the way they were going to connect on the ATB once glued in place and stamped the images across several squares in one go as shown in the picture:


I also used smaller pattern stamps and stamped across connecting edges and corners:


Once the stamping was done my result looked like this:


(of course I had to move some of the squares to different spots - depending on where I wanted to visually connect different cube sides across edges).

Time for some stencil fun with Distress Oxide inks!


I made sure I connected several squares with stencilled patterns as well!

Afterwards I inked the squares with "rusty hinge" Distress ink using my blending tool.


The inked squares got some spritzes of water here and there.


Finally I inked the squares' edges with black soot Distress Ink....


...before I glued these to their according sides on the ATB.


I wound some soft black wire around the cube and also added some word stickers and idea-ology letter tiles (yes, I still have some in my stash ;) - but I found that the design was still missing a little special something...

...so I decided to add two hand cut hearts (cut from left over scraps of grey board from packaging materials) that I inked with "ripe persimmon" Distress Oxide Ink. To that I added some spritzes of "fired brick" Distress Spray Stain and blended the edges with black soot again.


The hearts got tucked in the wire wraps. As a final extra I added a small wooden cube that I had inked with ripe persimmon and black soot and drawn a small heart on.


Done!


Some close ups:


and once more the finished ATB:


I hope you like my Artist Trading Block and have fun decorating your own!
All the stamps and inks used for this project are available in the Marte online store. Templates to build your own ATBs can be found in the internet (mine is a sturdier one from MDF but you can also
make ones from sturdy cardstock - which was the original idea as this way they can be folded flat if you do not glue all the edges together and sent in the mail to someone else for trading).

Thanks so much for stopping by today! Hope to see you soon!


Claudia
xxx