martedì 14 luglio 2020

Floral Tag with PaperArtsy Infusions by Jenny Marples

Hi everyone and welcome. It's Jenny here, back to share more ideas for using your PaperArtsy Infusions and the beautiful stamp and stencil designs of Kay Carley. Today's project is a tag that plays with a number of ways of using the Infusions powders.


Let's see how this tag came together.

The main panel was stamped onto a strip of Dina Wakley Media Cotton Watercolor Paper (which is very absorbent) and I used images from Kay Carley's stamp set EKC06, available in the Marte store. To achieve the watercolour effect with Infusions and your stamp place it onto a stamping block or platform and then rub a little of the dry powder onto the surface of the stamp. I used a couple of colours together to get a colourful effect.


Mist the stamp all over with a little water to activate the dye colour and Walnut crystals in the Infusions powders.


Stamp onto the watercolour paper to reveal the image. You may get blots of ink and water which can be fixed later if you are not happy with them but remember, this is supposed to be more of a watercolour finish rather than crisp stamping.


After adding another stem use the smaller flower stem and apply dry Infusions powder in the same way as before. Mist with water and stamp onto the watercolour paper strip.


Once the leaf stems and flowers are stamped use some of the excess watery ink by splattering a little over the tag with a small paintbrush. Allow the inks to dry completely.


Here's where you get to sort out any blotchy patches you are not happy with; use white and black ink pens (I used Gel Pens) to add in little details like lines and dots, and to go over parts where there is too much ink. The aim is to enhance your stamped images with your own flourishes.


Now stamp two different sizes of dragonflies using the same method and powders as before. When dry tear along the edges to give them a feathered look. I added a few dots of Liquid Pearls to the bodies and hand stitched some lines onto mine at this stage.


Take a single ply piece of tissue and soak it in a little Infusions powder diluted with water. You need very little of the ink to colour the tissue and you can remove any excess with a cloth before drying with a heat tool.


Stamp and emboss across a whole strip of paper with the JOFY JM50 stamp and white embossing powder.


Mist the embossed paper with a little water before sprinkling Infusions powders onto the surface. Apply more water to allow the ink to spread over the whole surface - you'll see the embossed areas resist the ink. Heat set being careful not to remove any of the embossing ink and dab away any excess Infusions.


Here's what your paper will look like when the ink is dry - you'll see how the different colours in the die give a beautiful mottled effect across the surface.


Now for the main tag - I used a Small Tim Holtz Etcetera Tag - cover in blue paper/paint etc (I used a gel printed piece of tissue that had PaperArtsy Fresco Finish Paints on it). Use collage glue to apply the dyed tissue over the centre of the tag before applying paste/gel through Kay Carley's PS059 stencil.


To complete the tag layer the water coloured strip over scraps of coordinating papers before adding on top of your embossed paper. Layer that onto the tag using a piece of thick card to add some dimension. Add your dragonflies and other embellishments of your choice.

Here are some close ups of the finished tag to show you the details more clearly;


I hope you've enjoyed seeing today's project and can see the beauty in Kay Carley's stamp set. The stamps and Infusions are all available in the Marte store along with lots more PaperArtsy sets so make sure to check them out.

Thanks for visiting
Jenny (Pushing The Right Buttons)

martedì 7 luglio 2020

ICS#20.27 Painting a big flower ..... by Marcella

Hi everyone,

this is my last project concerning mixed media technique on wastepaper.

I'm starting with a first layer of Heavy Gesso white and then Light Paste opaque matte by Prima Marketing, applied with a rubber paintbrush


following by a second layer with Pasta Verde Rame stenciled with a Donna Downey stencil KeyHole Splatter DD-015


and then some free stamped (Kaisercraft Sketchy and Script) to realize other texture with Archival Ink Coffee and Potting Soil.


On this background I wanted to create a big flower and the Donna Downey stencil Cone Flower DD-097 was perfect!


I used Rosso Rubino for the petals and for the center Nero Bruno.


.... some other free stamped with archival ink black jet


With Distress Crayons Black and Vintage Photo I created shadow in some point of Pasta Verde Rame and some splatters all around.


I used Stabilo All Black Acquarellable and China Marker Black to create other shadow all around the flower...
                                         

.... and my mixed media big flower painting is finished!


martedì 30 giugno 2020

ICS#20.26 Two Cards by Francesca

Hi everyone,
today I propose two cards using two pattern cards, a bazzil and a stamp.


I cut a 10 cm strip of patterned paper (green background) and then cut it to 15 cm, so as to have two rectangles each 10x15.

From the second pattern paper (light background with green arrows) I cut two 8 x 13cm rectangles and glued them onto the pattern paper rectangles with a green background.

I ink the stamps with the black versafine and I stamped the back of a green bazzil to match the patterns used to prevent the texture of the bazzil from ruining the stamp.

Then I cut the stamps with the cutter and glued them with the thick double-sided adhesive on the postcards.

And here is a quick and simple design that can be useful when you have little time or want to use the card cutouts that we have advanced.


The materials used are
Pad cards MODA SCRAP The Spring Blossom
Stamps BEFORE MARKETING All About Me
Versafine black pad

See you next time
   Francesca

martedì 16 giugno 2020

"Embrace Art" Artist Trading Block - by Claudia

Hi, servus and ciao à tutti!

Claudia here again! Today I want to share with you an Artist Trading Block I've made using Aall & Create stamps and stencils and Distress and Distress Oxide Inks mainly.


I have used Aall & Create stencils #9 and #10 and stamp sets #26 and #10 alongside Distress Inks "black soot" and "rusty hinge" and Distress Oxide Inks "mowed lawn", "ripe persimmon", "fossilised amber" and "stormy sky". Distress Spray Stain "fired brick" was used to create the hearts I've added to the black soft wire and black archival stamping ink was used to stamp the Aall & Create images.

But let me take you through the process step by step (as always click on the images for a larger view):


I used the Artist Trading Block as a template to draw the squares on some heavy printer paper and then cut five squares of the same size.


Next I placed my squares the way they were going to connect on the ATB once glued in place and stamped the images across several squares in one go as shown in the picture:


I also used smaller pattern stamps and stamped across connecting edges and corners:


Once the stamping was done my result looked like this:


(of course I had to move some of the squares to different spots - depending on where I wanted to visually connect different cube sides across edges).

Time for some stencil fun with Distress Oxide inks!


I made sure I connected several squares with stencilled patterns as well!

Afterwards I inked the squares with "rusty hinge" Distress ink using my blending tool.


The inked squares got some spritzes of water here and there.


Finally I inked the squares' edges with black soot Distress Ink....


...before I glued these to their according sides on the ATB.


I wound some soft black wire around the cube and also added some word stickers and idea-ology letter tiles (yes, I still have some in my stash ;) - but I found that the design was still missing a little special something...

...so I decided to add two hand cut hearts (cut from left over scraps of grey board from packaging materials) that I inked with "ripe persimmon" Distress Oxide Ink. To that I added some spritzes of "fired brick" Distress Spray Stain and blended the edges with black soot again.


The hearts got tucked in the wire wraps. As a final extra I added a small wooden cube that I had inked with ripe persimmon and black soot and drawn a small heart on.


Done!


Some close ups:


and once more the finished ATB:


I hope you like my Artist Trading Block and have fun decorating your own!
All the stamps and inks used for this project are available in the Marte online store. Templates to build your own ATBs can be found in the internet (mine is a sturdier one from MDF but you can also
make ones from sturdy cardstock - which was the original idea as this way they can be folded flat if you do not glue all the edges together and sent in the mail to someone else for trading).

Thanks so much for stopping by today! Hope to see you soon!


Claudia
xxx


martedì 9 giugno 2020

ICS#20.23 Art Journal by Nora

Hello everyone!!! I hope you are well and healthy...
Today, I share with you these pages...


Video tutorial

See you soon!
Have a good time!
Byeee!!!

martedì 2 giugno 2020

ICS#20.22 Notes by Marcella

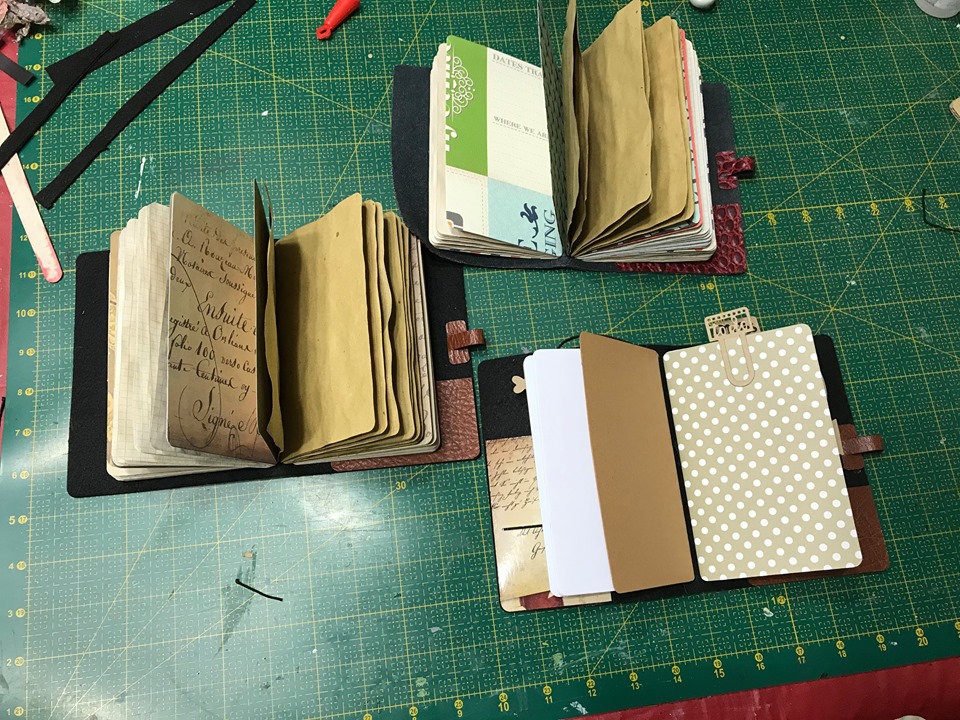
Here I am again on MarteLAB with a simple and useful project that involves the creation of a pocket note.

We use Sizzix 662467 and 662466 coordinated dies to make covers, internal pages and accessories.


The first thing is to choose the papers in harmony with the cover .... the interiors are made with aged papers and colored with coffee while the mixed scrap papers have been selected for the inner covers and inserts.

For the covers, instead, eco-leather cutouts were chosen....


With the dies, everything is truly realized .... from the cover to the pages to the inserts and all the embellishments that personalize the notes


And now some photos documenting the various passages, interiors and assemblies


I hope he gave you a good idea for your notes .... See you next time

  Marcella